As I have said many times on this blog and to my classes, it is important to have multiple streams of income and hobbies (which can become a stream of income).
I have loved gardening for over 20 years. I like to grow heirloom vegetables for my family to enjoy. But, over the last couple of years, I had been doing it less, primarily because I live in West Texas and the mid-summer sun (current temperature as I write this is 104 F.) tends to be brutal to the types of plants that I like to grow. Even setting up a shade system didn’t do much to help.
I’ve been toying with the idea of growing some veggies hydroponically indoors for several years but never made the jump. With the COVID pandemic happening and concern about the availability of fresh vegetables, I had started perusing hydroponic systems again.
Today, I was browsing the web on a quiet Sunday afternoon when I came across an ad for a hydroponic system (PVC pipe, pump, tubing, growing medium, and mesh pots) for around $300.
I figured I could build a similar system for around $100.
Challenge accepted.
Parts needed:
PVC pipe (drinking water safe): 10 feet
PVC pipe (support): 20 feet (rough estimate from looking at the picture for the $300 system)
Water pump for recirculating the water
Mesh pots (Max. size of 1″ diameter)
Growing medium (clay or stone wool)
The system also had a timer system, but I wasn’t concerned about that for this system.
The system I was looking at used a 2.5-inch PVC pipe with a smaller diameter pipe for support. So I made the trip to my local Lowes to see what they had. I found 2″ C-PVC, which is drinking water safe. I also would need a way of transferring the water between the pipes and making sure the pipes don’t over-fill. So, based upon what was available at the local store, I purchased 20 feet of 1/2 PVC pipe and the connectors for a gravity feed water system.
10′ of 2″ C-PVC pipe: $15.80
20′ of 1/2 PVC pipe: $7.84
Connectors:
2 -bags of 10 connector Tee: $9.10
1 -bag of 10 90 degree elbow: $3.24
8 -PVC 2″ to 1/2″ reducer : $18.64
PVC glue: 9.84
Lowes Total (including tax): $69.27
The pumps seemed overpriced at Lowes and there were no mesh pots or growing medium that I could find, so I went to Amazon:
100 7/8 inch mesh pots (2-inch height): $10.99
45 Rockwool growing medium (1 x 1 x 1.5): $8.99
160 GPH Aquarium Water Pump: $16.90
3/8 tubing (10′): $8.00
Amazon Total (including tax): $47.00
Grand Total (tax included): $116.27
I went a little over because of tax, but nowhere close to the $300 for the advertised system. I also purchased some hydroponic plant food. I already had a large basin for the pump and water reservoir. The nice thing is that should I decide to build a second system, my only cost will be the PVC pipe as I will have plenty of pots and growing medium. Thus, expanding to an 80 pot system would only cost an additional $60.
I spent the rest of my Sunday afternoon preparing the area that I will build the hydroponics system and writing this blog. Tomorrow, we start building!
The Amazon items should be delivered on Tuesday (You gotta love Primes 2-day delivery when you’re 2 hours from the next city!!), so I will be able to start my seeds then.
Version 1.0 (where I make a few mistakes)

Seeds are all started. I went with a mixture so that I can see what will work best for me and my family: spinach, kale, tomatoes, cabbage, Brussel sprouts, broccoli, okra, and leeks.

While I wait on them to sprout, I got busy making the hydroponic system.
I started by cutting the PVC pipe into the required lengths:
(Don’t cut yet, I made changes for Version 1.1! I’m just including this to document what I did and what I wasn’t happy with.)
The 2″ pipe was cut in half to form 4 – 5′ lengths.
The 1/2″ pipe had a lot more cutting:
8 – 2′ lengths (back support and cross supports)
10 – 3″ lengths (8 supports for the 2″ pipes, 2 for step 11).
4 – 1.5″ lengths (connectors)
6 – 14″ lengths (separators between the 2″ pipes)
1 – 43″ length (top of the back support)
2 – 6″ lengths (2 for front-bottom supports, 2 for in-take and out-flow)
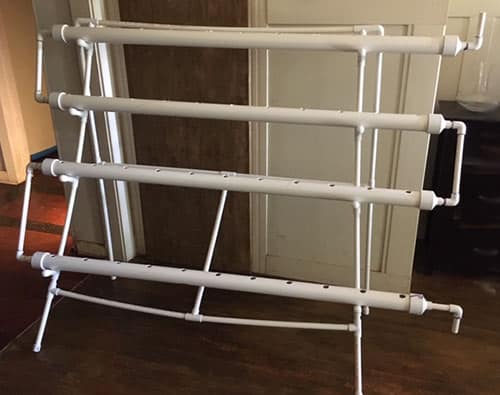
Support: Assembly of Version 1
The following only uses the 1/2″ pipe. The 2″ pipe is only used for the plants.
Back Support:
1) Connect 2 of the 2′ lengths with a T connector. Make three more. This is your back support. Place one of the connected pieces between the other two to form a giant H. The 4th will be used for the front part.
2) Place caps at the bottom of the H and elbows at the top.
3) Connect the elbows to a T connector at the top using the 1.5″ lengths.
4) Use the 43″ length to finish the back support.
Make sure that the pipe is level between the supports. Even a 1/2 inch difference will keep the system from working properly.
Front Support:
Working from the bottom up:
5) Place caps on the 2 – 6″ lengths.
6) Attach a T connector to the top of each 6″ length. The remaining joined piece that you made in step 1 above, connects these two pieces. It should look like an upside-down U with really short legs.
7) Place a 1.5″ length in the top of the T connector.
8) Attach a T connector.
9) Attach a 14″ piece to the top of the T connector. You can insert the 3″ supports to the remaining hole of the T connector and place a cap on the end.
10) Repeat steps 8 & 9 three times (for a total of 4 supports on each side for the 2″ pipes).
11) Using a 3″ piece, connect the front piece to the back support.

That leaves just one piece to add, a connector at the bottom between the two T connectors in the middle to help stabilize the structure.
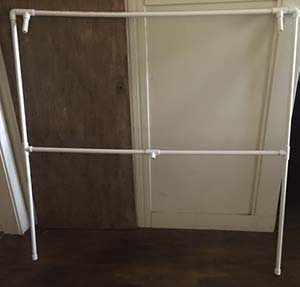
Before I cut and added this piece, I decided that I was not happy with Version 1 (thus, version 1.1 is not in progress). There were two things I was unhappy with that were only obvious to me after I had assembled it.
First, I want the bottom 2″ pipe to be a little higher to discourage our pets from eating the bottom growth (alternatively, you could grow things your pets like on the bottom pipe) and I wanted my water reservoir to be deeper than what the height of the bottom pipe would allow.
Second, the support uses a little more square footage than I had in mind. It currently comes out 2 1/2 feet from the wall (4′ x 4′ x 2.5′). I had in mind 1 1/2 to 2 feet, which gives 4″ to 6″ horizontal distance between each row for light and growth.
To fix these problems, I am going to 1) raise the bottom of the front support and 2) either a) shorten each of the in-between (14″) pieces or b) make the back support taller.
Version 1.1
The 2″ pipe was cut in half to form 4 – 5′ lengths.
The 1/2″ pipe had a lot more cutting:
9 – 2′ lengths (back support and cross supports)
10 – 3″ lengths (8 supports for the 2″ pipes, 2 for step 11).
4 – 1.5″ lengths (connectors)
6 – 10″ lengths (separators between the 2″ pipes)
1 – 43″ length (top of the back support)
2 – 6″ lengths (in-take and out-flow)
2 – 9″ lengths (bottom of front support)

I had about 3 1/2 feet of 1/2 pipe left and didn’t want to make another trip to Lowes, so here are the adjustments I made:
12) Replaced the 6″ pipes at the bottom of the front support with 9″
13) Cut 4″ off of 4 of the 14″ front support pipes (you could just do all 6 at 10″ and be fine as I noted in the revised cuts above).
14) Attached the remaining 2′ of 1/2 pipe to connect the front and back support.
Be sure to use the cement on the support. On my first attempt with water, gravity was not enough to hold everything together (so glad I was working on a concrete floor!).

Just Add Water
Next, we will set up the hydroponics.
First, I drilled the holes for the mesh pots. I chose to space the holes 3″ from the ends and then 5 1/2″ apart (center to center). I then drilled a pilot hole and used a 7/8″ hole drill to create the holes. This provided me with 44 spaces for mesh pots (Yeah! Starting 4 more seedlings!).
Once the wholes were drilled, I added the reducer. This is the secret sauce to getting the system to work correctly. Since the reducer is located in the middle of the hydroponic pipe, there will always be some water in the pipe; it won’t drain as fast as the water goes in.

Make sure your PVC pipe edges are clear of any rough edges from cutting, then using your pvc cleaner and cement, attach the reducer to the end of each pipe.
Once those are set, add a short (1 1/2 to 2 inch in length) 1/2 pipe to the reducer (using cleaner and cement. Then add a 90 degree elbow to each 1/2 pipe. Make sure the elbows are aimed toward each other so that the connecting pipe will be able to connect.
Measure and cut a 1/2 pipe to connect the two elbows.

Repeat this process to connect all 4 of your plant pipes.

On the remaining ends, add a pipe for the water to flow in, and a discharge pipe back to your water reservoir.


Because the room where the hydroponics system only has a west-facing window, I added a LED plant light to the frame to make sure the plants receive enough light – https://amzn.to/3hHnhmW
All that was left was to connect the pump and add water. I used a 5 gallon bucket with a lid. Since I have a cat that likes to sit on buckets, I cut three holes in the lid, one for the plug, the water return pipe, and the pump hose that attaches to the top in-take pipe.
Don’t forget to get some hydroponic-safe plant food for the system! I added 2 teaspoons of Epsom salt (magnesium) and 3 tablespoons of hydroponic plant food to the 5 gallon bucket to get things going.
By the time I finished the system, I had 7 cabbage & 4 tomato starts ready to insert. Once the system has been up and running (and looks nice and green) I will add additional photos.

Things I Will Do Different Next Time
While the 1/2 pipe is holding, I would be happier with less bend in the support pipes. Fortunately, I when I go to build my second system, I can replace the current 1/2 pipes with 3/4 pipe for minimal cost.
I’m looking forward to building a second one and adding another 44 plants for my families consumption. As I can add a splitter to the pump line and use the same 5 gallon bucket, my only cost for the new hydroponic system will be the PVC pipe and a few plant lights, which should bring the cost down to less than $80.
Brian Burton, Ed.D. is a professor of game-based learning who has many hobbies, including growing heirloom tomatoes and viticulture. You can see his blogs about building VR based apps on MyVRProfessor.com